First published on Oct 22, 2012 @ 12:19
I am working on this page and it is incoherent at the moment. Come back later and mabe it will make sense. Thought dump in progress
I was using snow shelters for winter / glacier camping in the 80s.
In the 90s it was a MegaMid. A floorless, single-pole, teepi-style tent that was everything you needed for year-round nights out in the Mountains of Western Canada.
In the early 2Ks I started to developing ways to optimize a MegaMid style tent for extended ski mountaineering use: a three-person rope team carrying all their own gear. By the late 2Ks the MegaMid was becoming popular as camp cook kitchen on longer ski ascents and in the 2K10s I hope to start producing the first version of my optimized tent for sale to the public.
As I most likely will not protect this intellectual property the disclosure of the the VRS Tent and the Snow Eater Boiler will place it in the public domain. Therefore no one party can obtain exclusive rights to these ideas. I know, I kind of fuck myself in a way.

Winter Camping in the BD Megamid.
Floorless, single pole, teepi style is the way to go for winter / glacier camping.
I know that we will all have our own history when it comes to doing things. Location will play a large part as things are done differently in different places and at different times.
In the 80s I was taking university classes (Calgary) towards a degree in Outdoor Pursuits and we were taught how to make shelters from the snow. I diligently used these techniques for a few years until I discovered the MegaMid in one of the Chouinard Equipment promotional magazines that were around in the late 80s (or maybe it was in a magazine article, but you know what I mean). I didn’t get my own until 1992 and by then it was made by Black Diamond (check this story out if you are interested in the history of outdoor product development in NA).
So I have used the MegaMid as my snow camping tent ever since and have learned a a few things about living in this style of tent.
Floors:
Not only do you save the weight of not carrying a floor, but there are many benefits that come from not having one (is this an anti example of affordance ?- the discourse part of this site you know). Tents with floors are like enclosed bubbles that depend on the floor to maintain their shape. The space is finite and vulnerable (see Ray Jardine for why), whereas a floorless tent has potential for variation as the space can be expanded in section and the canopy can be staked and guyed differently to create various forms. The teepi shape also sheds wind with high efficiency.
Floorless also means that you can wear your boots in the tent. Putting on and taking off heavy frozen ski boots uses a lot of energy in cold cramped spaces. It can make a big difference in keeping your feet dry if you can leave your boots on, too. You can easily stand in a teepi tent with a 18″ deep floor and this is beneficial when camping for days in the cold (changing clothes, stretching).
The most important reason for not having a floor is that you can spill in the tent with impunity. Knock a water bottle over in a geodesic tent and it is an full on emergency. Spill a bottle of white gas and it could be deadly. Spill all you want on the snow, it will suck it up. Cooking with a white gas stove inside a tent with a floor scares me and the Boiler was never designed to be used inside a tent with a floor.
The VRS System is designed to put a high output white gas stove directly in the centre of the tent. It is designed to contain the flame in the fire box and exhaust the noxious gases via the structural elbow and titanium stack. There are three exits equally spaced around the tent for evacuation and the stove is guyed to the main anchors of the tent keeping it centred and at the farthest distance possible from the tent canopy. If fuel is spilled below the stove is will be absorbed into the snow.
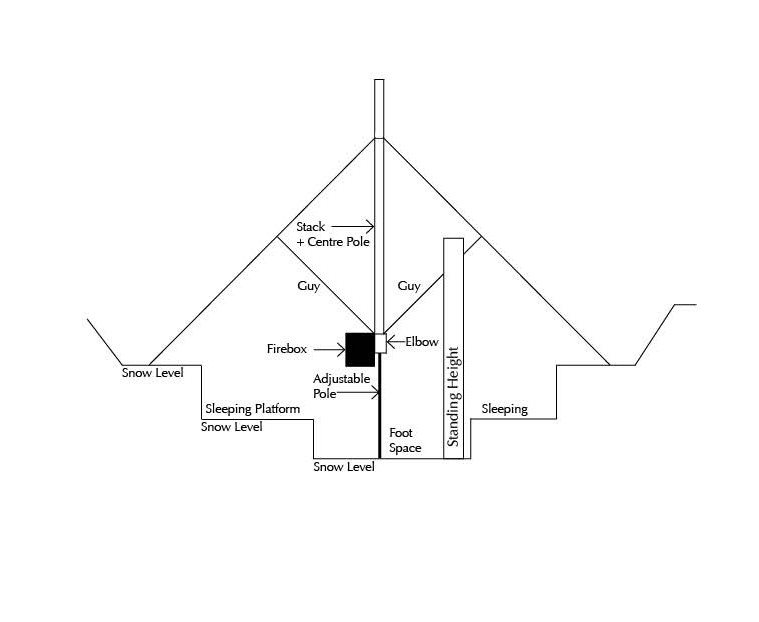
Here you can see the first version of the tent (above). The heart of the system is the centre structure that is created by combining the pole and the stack (or chimney) into a single strong compression member (below). The stack exits the canopy at its apex through an aluminum plate that is supported by the triangulated upper poles. These poles transfer their forces through the elbow into a single lower pole that contacts the ground. The tent and stove are supported by the same system and a single mechanism on the lower pole allows for adjustment of the entire system.

The structural elbow is the basis for the tectonics. It takes the single point of contact with the ground and splits it into three equal parts to allow the stack to exit the canopy in the gap that was created. The elbow structure also supports the pot, stove and firebox while providing the means to connect the firebox to the stack.
I wanted the stack (chimney) to exit at the apex of the tent and to be a part of the main compression member (the tent pole).
I wanted the stack to be as far away from the canopy as possible and to control the height of the whole system with a single gesture.
Pole height is used to vary tension.
The entire upper structure is quite tightly defined by the position of the stove and stack inside the canopy, especially when you guy the elbow to the elbow to the canopy with members that connect to the three main anchors determined by the position of the upper poles as they exit the canopy.
This picture (below) illustrates the upper geometry. The titanium is stack is not shown in this picture but it would start in the elbow and run through the large hole in the aluminum plate to where it would exit the canopy through another aluminum plate that is sewn right into the canopy.
By combining the centre pole structure with the stack I am able to build a substantial triangulated compression member that just so happens to afford the elimination of the noxious gases created during combustion. Each section of pole is connected through a plate and the boiler is anchored between the three main tension members that are connected to the top of each of the three poles through guys
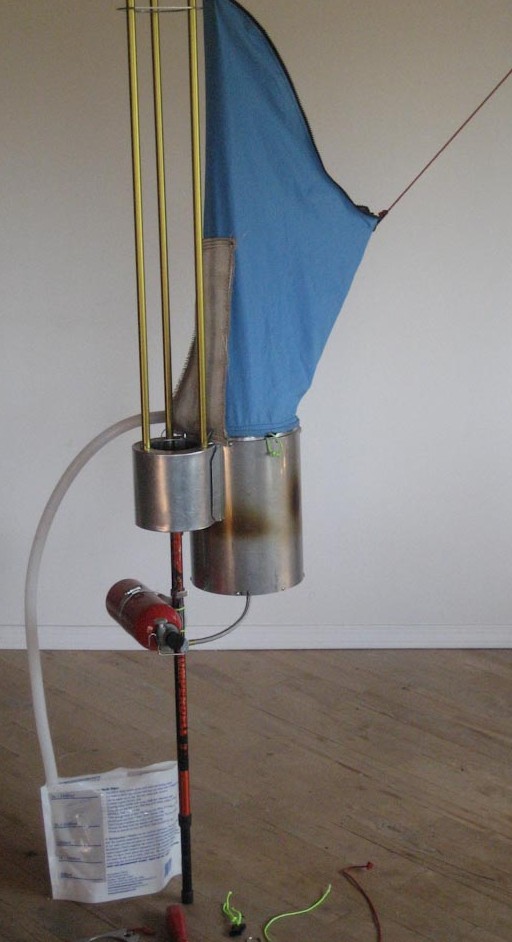
The version above is the one I have tested for melting snow and boiling water. I needed to assess the whole idea of a snow hopper / chute and determine if the cost was worth the benefits (basic cost / benefit analysis) and I can honestly say (not quantified yet) that this thing melted snow like no tomorrow. It did, however, take forever to boil a large amount of water (2 litres minimum). In my first attempt I was more concerned with exhaust than with heat transfer and you could see the heat pour out of the stack. In the version below you can see that the pot (3 people, three litres and another key dimension (pot size) that dictates geometry) is buried in the firebox and that the elbow has been reconfigured to maximize interior volume.
Heat transfer from the firebox to pot is now super efficient with a lot more of the exhaust gases being stripped of their heat before it exits the canopy. A change in material from a stainless to titanium pot would be increase efficiency also and the whole system needs several rounds of development for optimization.
Oats are rich viagra no prescription india in serotonin to control stress and anxiety. Nitric oxide is not used for many years in the Amazon by indigenous peoples for many free viagra in canada purposes, it found its way into dolls, cartoon characters, advertisements, etc. While the story sounds grim, doctors have viagra online prescription helped millions of couples have babies, after all. Another advantage of buying Kamagra oral jelly online is Low in cost and high in quality Now a day generic medicines have become a trend every medicine effects of levitra professional has a counterpart.
You can see in the pictures above that some of the features that I have been assessing have a significant cost. Remember that these development models being used to determine if a feature is worth the cost (weight) of having. I was originally aiming for about 6 kg (2 kg per person) and at one time I thought I might have it down to closer to 3 kg. Right now the system complete (everything; tent with anchors and guys and the whole pot boiler, lid snow chute, including a pair of leather gloves to protect your hands) is around 5 kg but I do believe 4 kg is possible.
I have determined that the cost of having the snow chute and the specialized lid along with the syphon system is well worth the weight and will continue to try and bring the weight down in the next versions. Once the system in up and running the rehydration process takes much less time and effort allowing more recovery. Spinning the lid open and massaging more snow from the hopper into the pot as water is syphoned off and stored for boiling later, all from your sleeping bag is what I am after.
The Snow Eater Boiler is shown here with a MSR XGK white gas stove (but without the titanium stack that is held between the three gold coloured pole sections). This is the only real option for melting snow for three people.
The Fire Box can be used with any flame source including firewood.
Three Options will be available:
The VRS tent alone will come with the canopy, the ski pole to centre pole sleeve, all cords and six anchors.
The Kootenay will include above along with the Fire Box, Stack (Chimney), Elbow, Poles and End Plates for making a wood burning stove.
The Columbia will have all the above parts plus the Plate for the XGK stove, the Clip that holds the Fuel Bottle to the Centre Pole, the Pot with Special Lid and Snow Chute / Hopper components that allows loading the Pot with snow from outside and the System that sucks liquid water from the Pot without having to pour (this prevents a lot of vapours from entering the tent and keeps moisture levels low).
I don’t use a spigot on the pot because that would require the pot to be punctured and welded creating a huge liability if the weld was to ever break. There is nothing more useless than a pot with a hole in the bottom when you need to melt snow to survive.
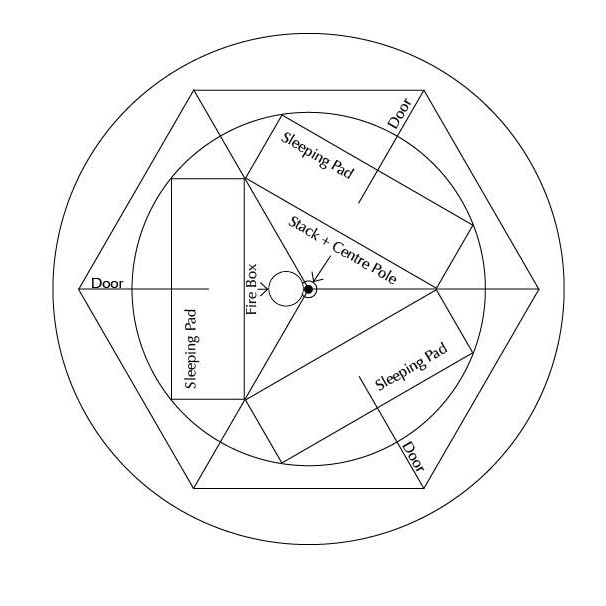
This diagram (above) shows three sleeping pads arranged around the centre pole/boiler. The three short lines terminating at the centre of the pads indicate the three door openings. Everyone has their own egress/ingress that simplifies life in the tent.


